Your First Deploy
Deploying a project from GitHub to a live URL, understanding the build process, and how automatic re-deployment works.
You've built your personal website on Project 1. It works perfectly on localhost:5173. Every time you open it in your browser, you see it — buttons work, layout is correct, it looks exactly how you want it.
But localhost means "this machine, right now." It's not a real address. It only works when your laptop is open, your dev server is running, and the person trying to access it is sitting next to you.
"You push your project to Vercel — and suddenly it has a URL like
mysite.vercel.appthat anyone in the world can access from any device, at any time, whether or not your laptop is on."
This page walks you through making that happen.
What Happens When You Deploy
Before you click the button, it helps to understand what Vercel is actually doing when you deploy a React or Next.js project.
Your project right now is a collection of .tsx, .ts, .css, and config files — source code. Browsers cannot run source code directly. Browsers understand HTML, plain JavaScript, and CSS.
Vercel runs your build command (e.g., npm run build or next build) on its servers. This compiles your TypeScript, bundles your JavaScript, processes your Tailwind CSS, and produces a folder of optimised static files. Those files are then distributed to Vercel's servers around the world.
The whole build takes 30–90 seconds for a small project. You watch it happen in real time.
Deploying Your Project
Open the Vercel dashboard and click "Add New" → "Project"
You'll see the "Import Git Repository" screen. This shows all GitHub repositories Vercel can access.
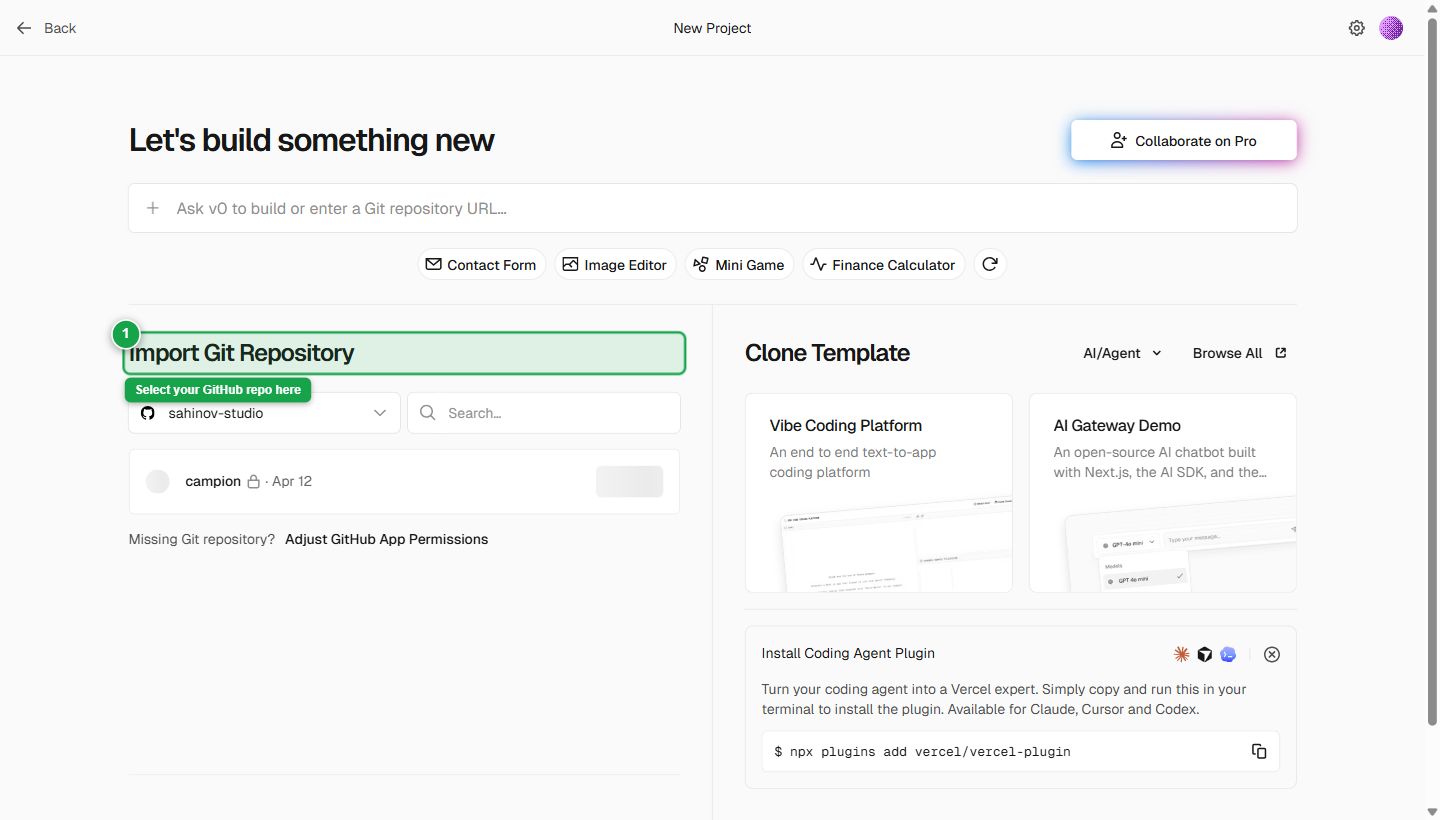 Vercel's import screen lists every GitHub repo it has access to. Click Import next to the one you want to deploy.
Find your repository and click "Import"
Your personal website repository should appear in the list. Click Import next to it.
If your repository doesn't appear, click "Adjust GitHub App Permissions" to grant Vercel access to it.
Configure the project settings
You'll see a configuration screen with several fields. Vercel is smart — it detects your framework automatically and fills most of these in for you.
Project Name
Auto-filled from your repository name. You can change it — this becomes part of your default Vercel URL (e.g., my-project.vercel.app). Use lowercase letters and hyphens only.
Framework Preset Vercel detects whether your project is Next.js, Vite, Create React App, or another framework. It should be auto-selected. Verify it matches what you actually built.
| If your project uses | Framework preset to select |
|---|---|
| Next.js | Next.js |
| Vite + React | Vite |
| Create React App | Create React App |
Root Directory
For a standard single-app repository, leave this as ./ (the default).
For a monorepo like Sahinov (where the app lives inside apps/sahinov-web/ rather than the repo root), you must set this to the correct subfolder. Click Edit next to Root Directory and type the path. If Vercel builds from the wrong folder, the build will fail with a "no package.json found" error.
Build Command and Output Directory These are auto-detected. Do not change them unless you have a specific reason to. Vercel knows the correct values for each framework preset.
Add environment variables (if your app needs them)
If your project connects to Supabase, it needs environment variables — specifically VITE_SUPABASE_URL and VITE_SUPABASE_ANON_KEY (for Vite) or NEXT_PUBLIC_SUPABASE_URL and NEXT_PUBLIC_SUPABASE_ANON_KEY (for Next.js).
Add environment variables NOW, before clicking Deploy. If your app requires them and you don't add them here, the first deploy will succeed (the build will complete), but the running app will fail to connect to Supabase. You'll see auth errors or blank screens. It's easier to add them now than to debug a broken deploy.
Click "Add" in the Environment Variables section. Add each key-value pair. The next page covers environment variables in full detail — for now, if you're deploying a simple static site with no Supabase connection, you can skip this.
Click "Deploy"
Vercel will begin the build process. You'll see a live build log stream in the browser — lines of output appearing in real time as Vercel installs your packages, compiles your TypeScript, and bundles your app.
What to watch for:
- Lines starting with
npm installorpnpm install— installing packages (normal, takes 20–40 seconds) - Lines about "Compiling" or "Building" — the actual build (10–30 seconds)
- A final line saying "Build Completed" or "Generated static files"
- A green checkmark and confetti animation — deploy succeeded
If you see a red error: Read the last few lines of the build log — they will tell you exactly what went wrong. Common causes: missing environment variable, a TypeScript error in your code, or the wrong root directory setting. Fix the issue and redeploy.
Get your live URL
After a successful deploy, Vercel shows your project dashboard with a large green checkmark. Your live URL appears in the centre — something like my-personal-site.vercel.app.
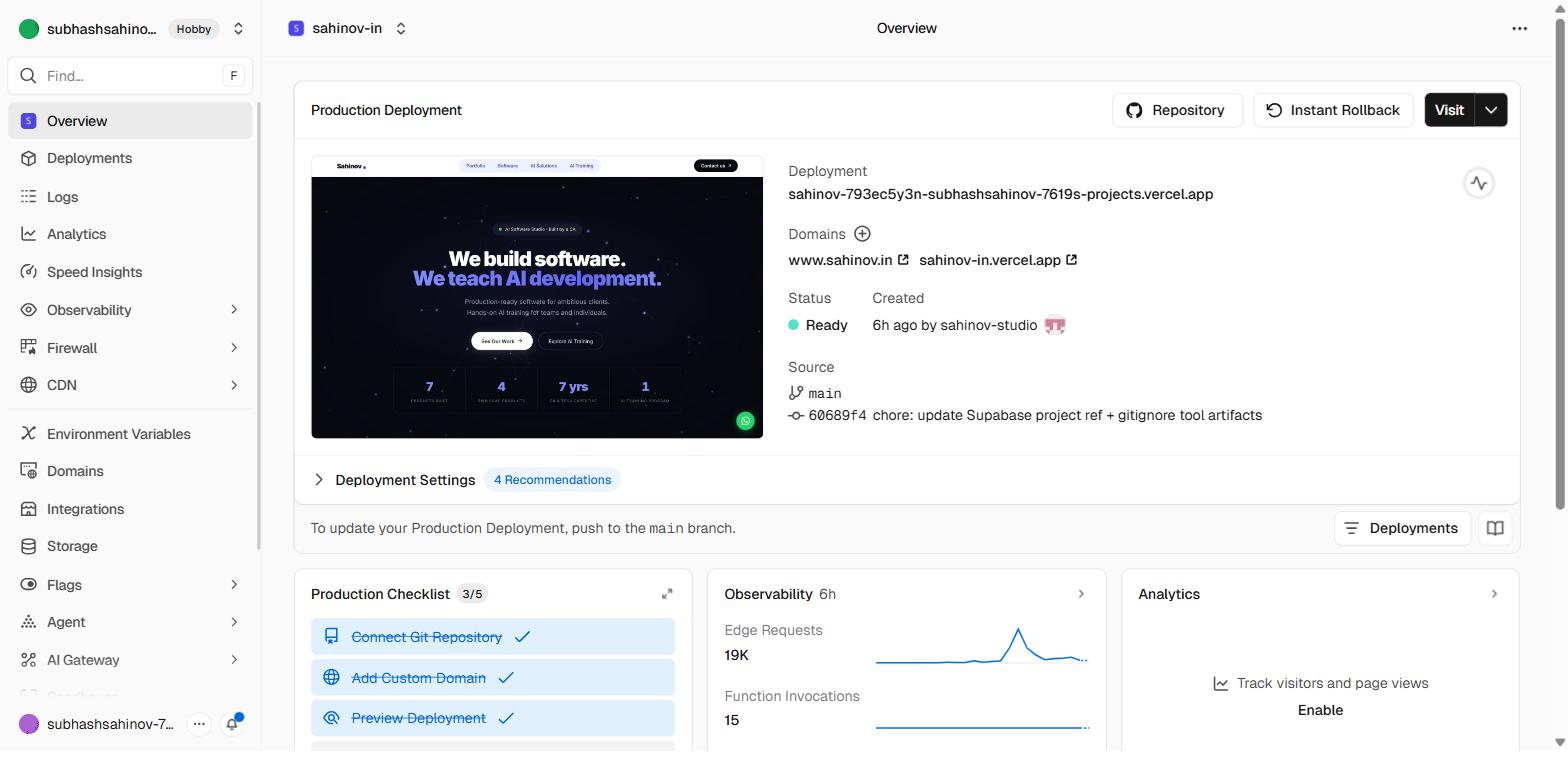 The project overview page. The Settings and Deployments tabs at the top are the two you'll use most often.
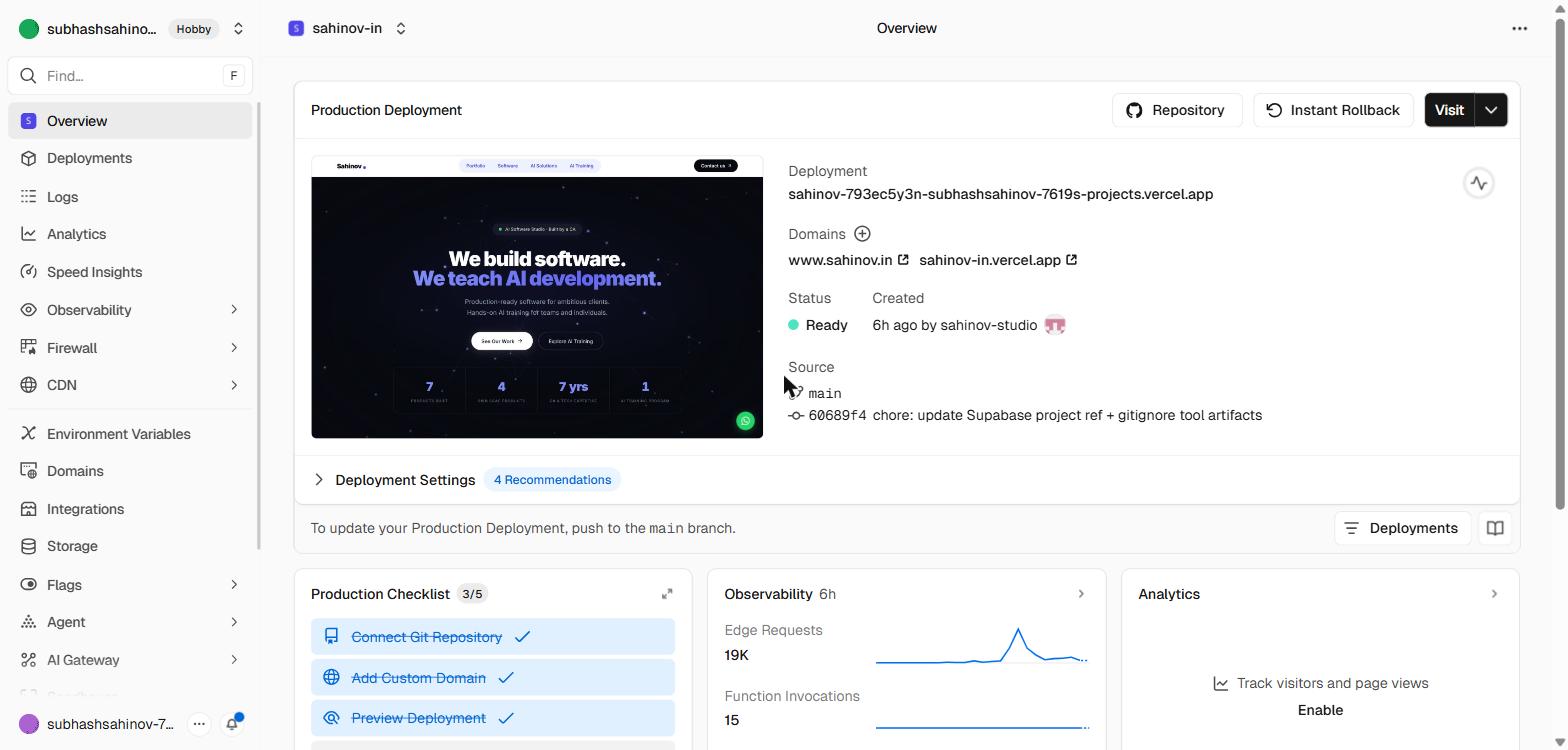 The production deployment card shows the live URL, the commit it was built from, and quick links to logs and the build output.
Click it. Your site opens in a new tab. From a real server. With a real URL. Send it to anyone and it will work.
.vercel.app URL and open it on your phone. If the site loads on both desktop and mobile, the deployment is complete and working.How Automatic Re-Deployment Works
You never need to come back to Vercel and click "Deploy" again. From this point forward, the workflow is: make a change in VS Code → save → commit → push to main. That's it. The deploy happens automatically.
Vercel is watching your main branch. The moment a push lands there, a new deployment starts. You can watch it in real time from the Vercel dashboard — a new row appears in the Deployments tab with a spinning indicator, then turns green when done.
Your old deployment is never fully gone. Vercel keeps a history of every deployment. If a new deploy breaks something, you can "rollback" — promote an older deployment back to live — in two clicks. This is your safety net.
main. Then switch to the Vercel dashboard and watch the Deployments tab. A new spinning row should appear within 30 seconds. When it turns green, click "Visit" and confirm your change is live. You've just completed the full push-to-deploy cycle.Preview Deployments — The Team Workflow Feature
This is the feature that separates professional development from "upload and hope."
When you create a pull request (PR) on GitHub — a request to merge a branch into main — Vercel automatically deploys that branch to a unique URL. You don't do anything. It happens within 90 seconds of the PR being opened.
That URL looks like: my-site-git-feature-contact-form-abc123.vercel.app
Vercel also posts a comment directly on the GitHub PR with:
- A link to the preview URL
- The deployment status
- A button to view the build log
Why this matters for your work:
| Scenario | Without preview deployments | With preview deployments |
|---|---|---|
| Subhash reviews your work | Must run your branch locally | Clicks the preview URL |
| Client reviews a feature before it goes live | Must set up a staging server | Clicks the preview URL |
| You find a bug after submitting | Fix it in the branch — preview URL updates automatically | Fix in the same branch — preview updates |
| Two teammates working on different features | Risk of breaking each other's work | Each feature on its own URL |
Every PR gets its own preview. The live site on main is never touched until the PR is approved and merged. This is the professional workflow you'll use on Aurora Public School and every client project.
The Deployments Tab
Inside your project on the Vercel dashboard, the Deployments tab shows every deployment ever made.
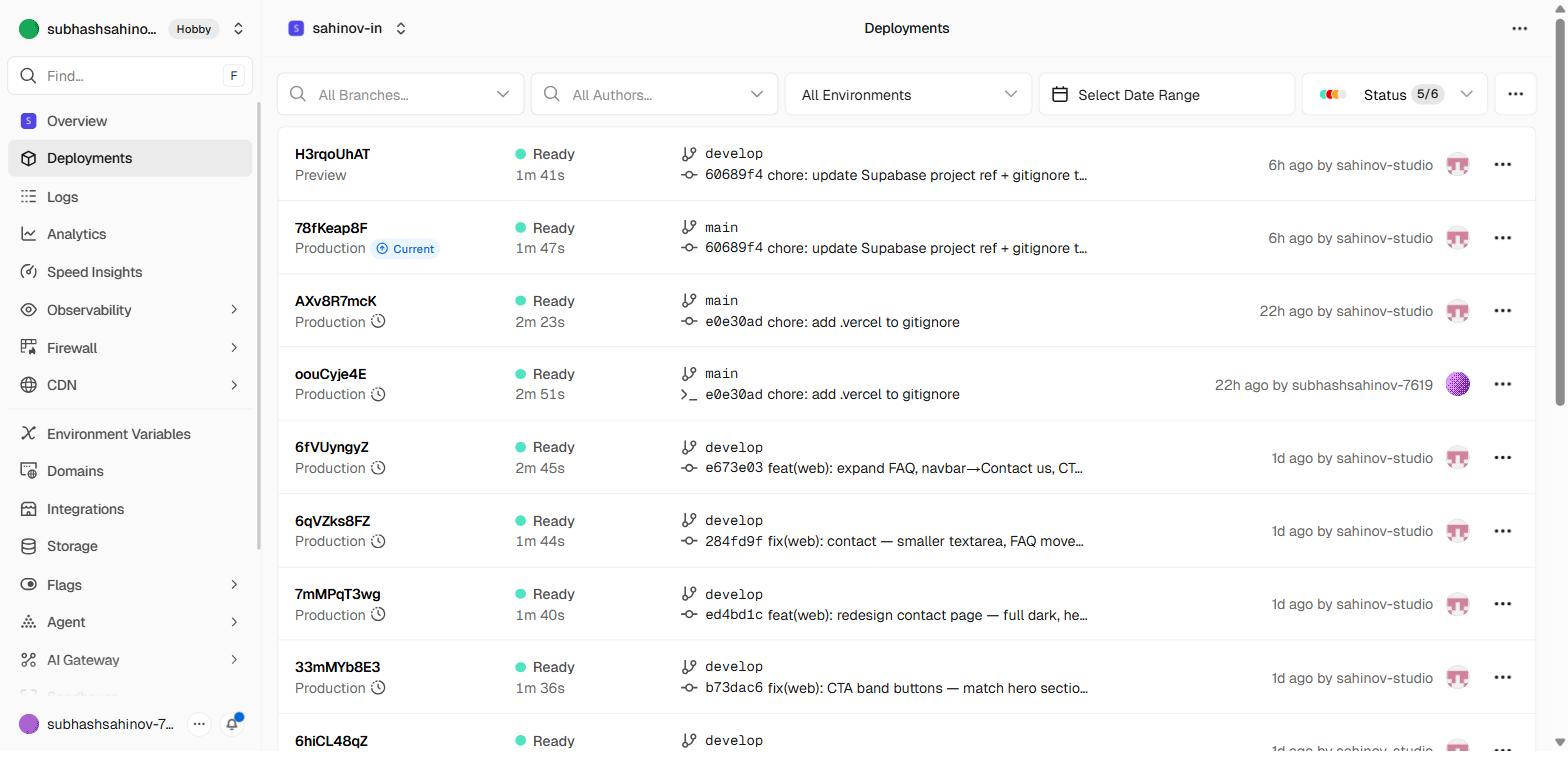 Every push, every PR, every manual redeploy gets a row here — with status, branch, commit message, and timestamp.
Each row shows:
- The commit message that triggered the deployment
- The branch it came from (
main, a PR branch, etc.) - The deployment timestamp
- The status (building, ready, error, cancelled)
- A "Visit" link to open that specific deployment
You'll use this tab to:
- Check if a deployment is in progress after a push
- Read build logs when something fails
- Identify when a bug was introduced (compare two deployments)
- Roll back to a previous version by clicking "..." → "Promote to Production"
Understanding Your Deployment URL Structure
Vercel gives your project three types of URLs:
| URL type | Example | When to use |
|---|---|---|
| Production URL | my-site.vercel.app | The main live site — share with clients |
| Vercel alias | my-site-abc123.vercel.app | Auto-generated, stable per deployment |
| Preview URL | my-site-git-branch-name-abc123.vercel.app | PR-specific, deleted when PR is closed |
| Custom domain | myschoolapp.com | Your own domain — see the next section |
The production URL always points to the latest main deployment. Preview URLs point to a specific commit on a specific branch. When a PR is merged and the branch is deleted, Vercel cleans up the preview URL automatically.