Authentication Setup
Configure Supabase Auth so your app knows who is logging in — and can tell your admin screens from your public screens.
Why First
Your app has two types of screens: public (the landing page, the school overview, the login form) and private (the user dashboard, the admin panel, the fee payment history).
How does the app know the difference between who is who? Anyone can type /admin in a URL. Without authentication, the page either loads for everyone — which is a disaster — or you add a check in code that says "if you're logged in, show this" — but logged in as whom? What stops me from logging in as a regular user and accessing an admin-only screen?
Authentication is the system that answers "who are you?" with a verified, cryptographically signed answer. After login, every request your app makes to Supabase carries a token that proves the user's identity. Supabase verifies that token before responding. Your RLS policies (next page) use that identity to decide what data to return.
Excel analogy: The "Protect Workbook" password, plus a sign-in sheet at the door. Not just "is the file locked?" but "who opened it, when, and what role do they have?"
Navigating to Auth
In your Supabase project dashboard:
- Click Authentication in the left sidebar (the person icon)
- You land on the Users tab — a list of everyone who has registered for your app
- Three important tabs at the top: Users, Providers, URL Configuration, Templates
 The Users tab — every registered user, their provider, and last sign-in. Your starting point inside Authentication.
Providers: How Users Log In
Click the Providers tab. This is where you decide which login methods your app supports.
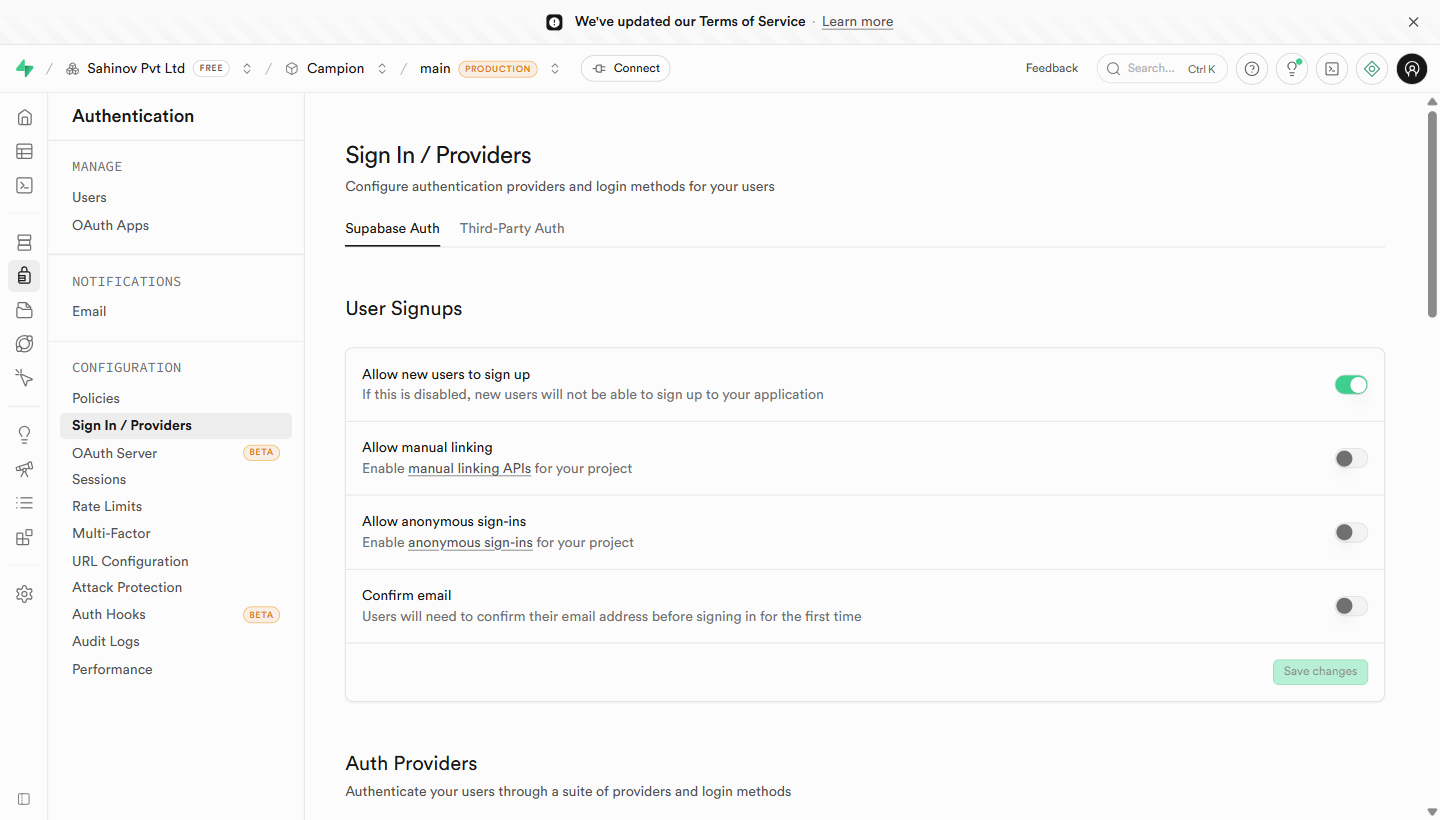 Providers tab — toggle Email, Google, GitHub, Phone, and other login methods.
Email Provider (most important — enable this first)
- Find Email in the provider list and click it
- Toggle Enable Email Provider to on
- Two options appear:
- Confirm email: users must click a verification link in their email before their account activates. Turn this ON for production apps — it prevents fake accounts and typos from locking people out.
- Secure email change: requires email confirmation when a user changes their email. Leave this ON.
- Click Save
Magic Links vs Passwords: Supabase supports two email login modes. With password login, users set a password and enter it each time. With magic links, Supabase emails them a one-time link — they click it, they're in. Magic links are more secure (no password to steal or forget) and easier for non-technical users. For professional B2B apps, magic links are increasingly the preferred choice.
Google OAuth (for consumer-facing apps)
Google login ("Continue with Google") is the fastest way for users to start — one click, no password. For Aurora Public School's customer app, this is ideal.
To enable it, you need credentials from Google Cloud Console first (covered in the Google Cloud guide). Once you have them:
- Find Google in the provider list, click it
- Toggle Enable Google Provider to on
- Paste your Client ID and Client Secret from Google Cloud Console
- Copy the Callback URL shown in Supabase — you need to paste this back into Google Cloud Console
- Click Save
The callback URL step is critical. If you don't add Supabase's callback URL to your Google Cloud Console's "Authorized redirect URIs" list, Google login will fail with a "redirect_uri_mismatch" error. This is one of the most common OAuth setup mistakes. Add the callback URL to Google Cloud before testing.
Phone / OTP Provider
For Indian apps that need SMS-based login (send a code to the user's mobile number), Supabase supports phone auth via an SMS provider like Twilio or MSG91. This requires a paid SMS service account. Configuration is in Providers → Phone — covered in the SMS Notifications guide when relevant.
URL Configuration — The Most Common Silent Failure
Click the URL Configuration tab. This is where you list every URL that Supabase is allowed to redirect to after login.
 URL Configuration — Site URL plus the Redirect URLs allowlist.
When a user clicks a magic link in their email or completes Google OAuth, Supabase sends them to a URL. For security, it will only redirect to URLs you have explicitly approved here. If the URL is not on the list, the redirect silently fails — the user sees nothing, or a generic error.
Add these URLs:
| URL | When you use it |
|---|---|
http://localhost:5173 | Local development (Vite's default port) |
http://localhost:3000 | If using Next.js locally |
https://yourapp.vercel.app | Your Vercel preview URL |
https://yourapp.com | Your production domain (when you have one) |
To add a URL: click Add URL in the "Redirect URLs" section, paste the URL, press Enter.
Add your redirect URLs before you test login. Magic link login, Google OAuth, and email confirmation links all depend on this list. If your local dev URL is not here, your first login test will silently fail and you will spend an hour debugging the wrong thing.
Email Templates
Click the Templates tab. This is where you customise the emails Supabase sends to your users — the confirmation email when they sign up, the magic link email, the password reset email.
 Email templates — confirmation, magic link, password reset, change email, invite.
The defaults work. Before launch, customise:
- The "From" name (change from "Supabase" to your app name)
- The email subject line
- The body text (add your logo URL, update the copy to match your app's voice)
Templates use {{ .ConfirmationURL }} as the placeholder for the link Supabase inserts.
Hooks, Rate Limits, and MFA (advanced)
Three more tabs you should know about, even if you don't configure them on day one.
Hooks — custom code that runs at specific points in the auth flow (e.g. when a user signs up, after a successful login). Use case: assign a default role to every new signup, or push the new user into your CRM.
 Auth Hooks — wire custom Postgres functions or HTTP endpoints into auth events.
Rate Limits — caps on how many sign-ups, password resets, magic links can be sent in a given window. The defaults are sensible. Tighten them before launch.
 Rate limits — sign-ups, password resets, OTPs, magic links per hour.
Multi-factor Authentication (MFA) — Supabase supports TOTP (authenticator apps). Turn it on for any project handling money, KYC, or admin access.
 MFA settings — enable TOTP enrolment for your users.
Viewing and Managing Users
Back on the Users tab, you can:
- See every registered user, their email, when they signed up, when they last logged in
- Invite user: manually add a user (useful for creating admin accounts)
- Click a user → Reset password (sends them a password reset email)
- Click a user → Delete user (permanent — use with caution)
- Click a user → Suspend user (blocks login without deleting the account — preferable to delete for moderation)
Create your first admin account this way. Once your app's admin role is set up in the profiles table (covered in the database module), use "Invite user" to add your own email as the first admin. This gives you a clean test account without going through the public signup flow.