Personal Access Tokens
GitHub no longer accepts passwords for command-line access. A Personal Access Token is what you use instead — here's how to create one and where to keep it safe.
Why First — the scenario
You've set up Git on your laptop, cloned your repository, made your first commit, and typed git push. Git prompts you for your GitHub username and password. You type them. Git says:
GitHub stopped accepting passwords for command-line access in 2021. This was a security decision — passwords entered in terminals are vulnerable to being captured by malicious software, logged accidentally, or typed into the wrong place.
Instead, GitHub requires a Personal Access Token (PAT) — a long, randomly generated string that proves your identity to GitHub's systems without involving your password.
Think of it the way CAs think about digital signatures. Your password is something you know. A digital signature (or a PAT) is a cryptographic credential that proves identity in a way that can be audited, scoped, and revoked independently of your password.
When Git prompts you for a password in the terminal, you paste the PAT instead. GitHub accepts it. Your push goes through.
Creating a Personal Access Token
Open your GitHub Settings
Sign in to GitHub. Click your profile photo in the top right corner of any GitHub page. A dropdown menu appears. Click Settings.
This opens your personal account settings — a long page with a left sidebar containing many categories.
Go to Developer settings
Scroll down the left sidebar until you reach the very bottom. The last item is Developer settings. Click it.
You're now on the Developer settings page. The left sidebar shows three options:
- GitHub Apps
- OAuth Apps
- Personal access tokens ← click this
Select Tokens (classic)
Under Personal access tokens, you'll see two sub-options:
- Fine-grained tokens — newer, more restrictive, scoped per repository
- Tokens (classic) — the standard token that works across all your repositories
Click Tokens (classic).
You'll see a list of any existing tokens (empty if this is your first time). On the right side, there's a button: Generate new token with a dropdown arrow.
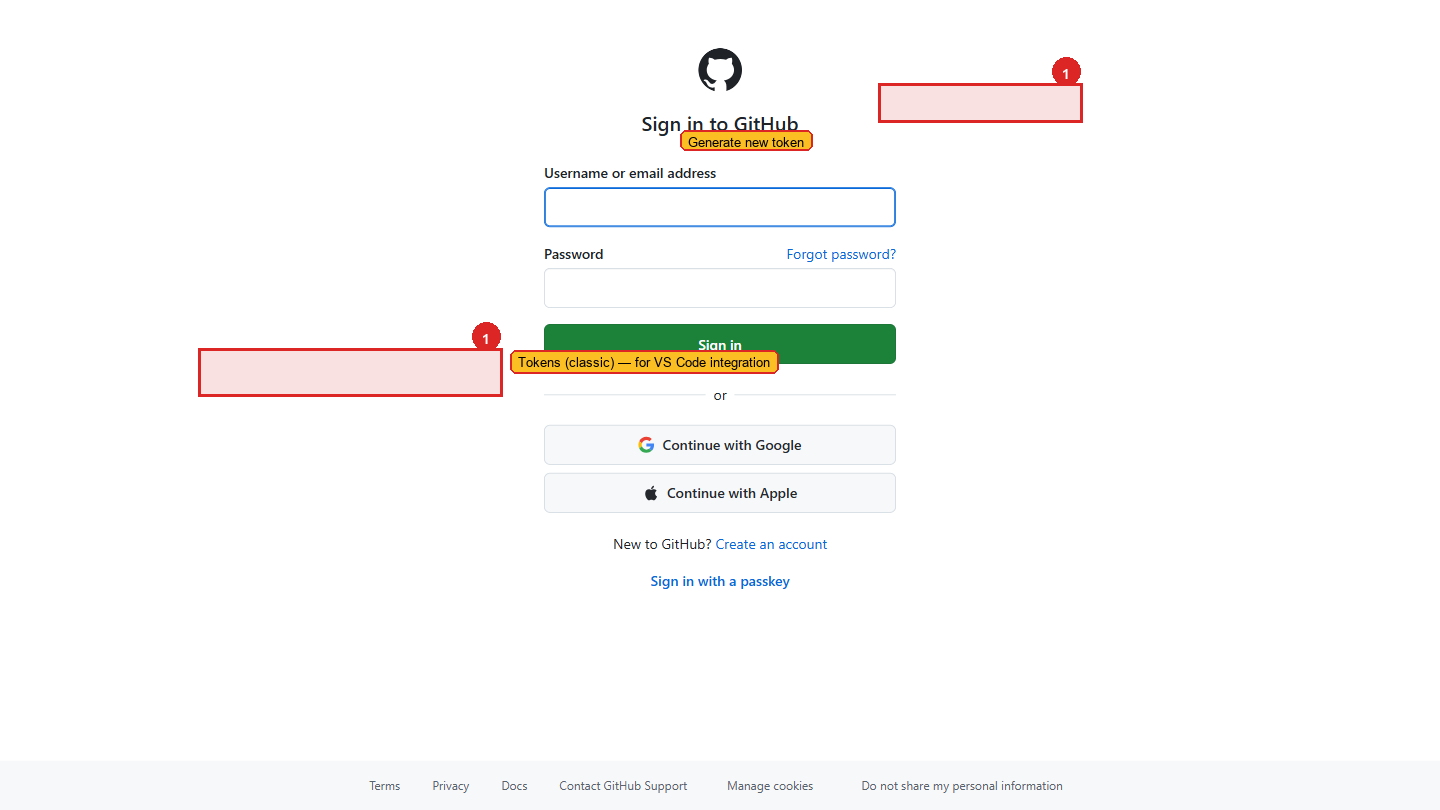 The Tokens (classic) page. Existing tokens are listed here; click Generate new token on the right to create one.
Generate a new classic token
Click Generate new token and select Generate new token (classic) from the dropdown.
GitHub may ask you to confirm your password before proceeding. Enter it and click Confirm.
Fill in the token details
Note (name): Give this token a descriptive name so you know what it's for. Use a name that identifies the device and purpose.
Good examples:
VS Code - Work LaptopTerminal - Windows DesktopDeployment - Vercel Project
This name appears in your token list. When you have multiple tokens across multiple devices, the name tells you which is which without revealing what the token does.
Expiration: GitHub defaults to 30 days. Change this to 90 days.
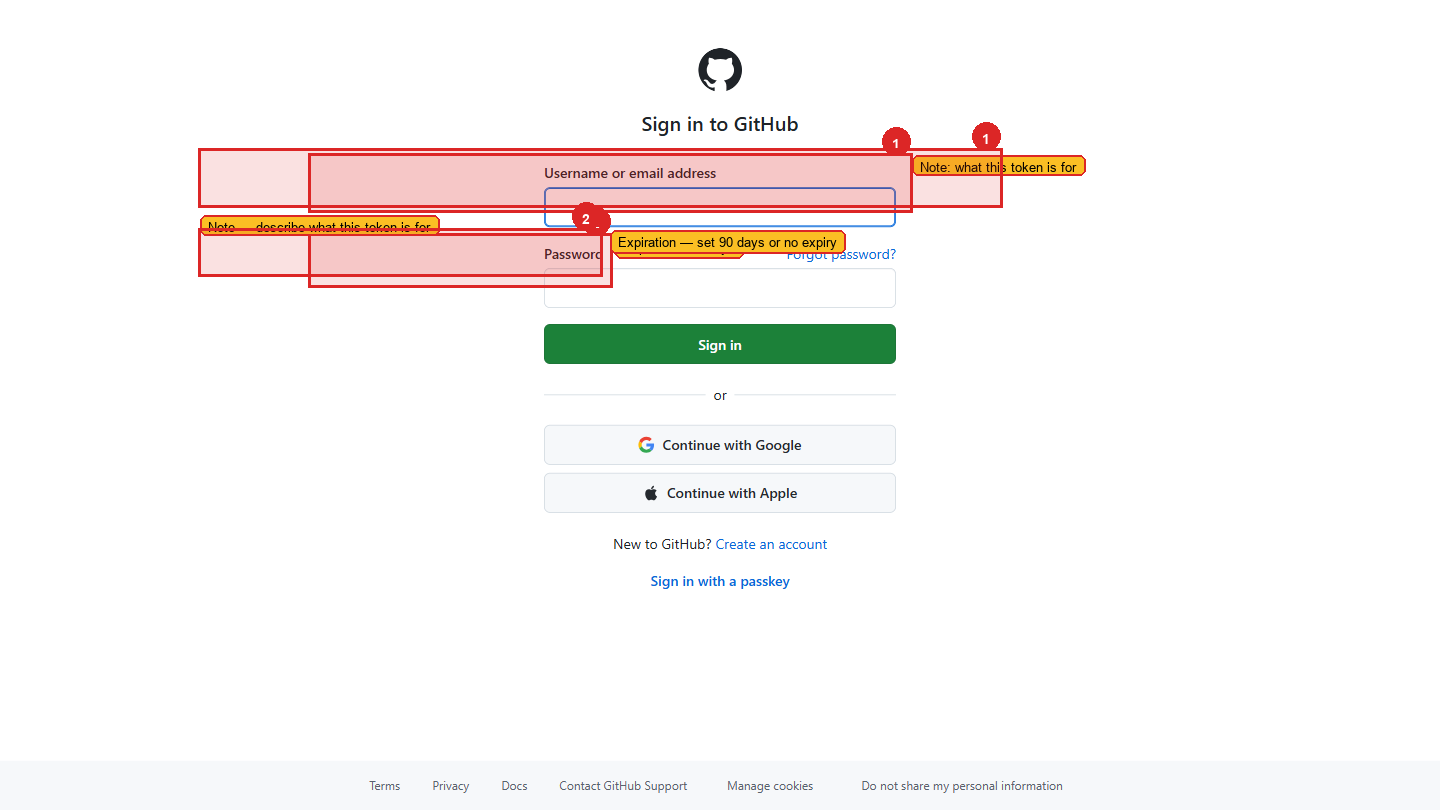 Give the token a descriptive name and set the expiration to 90 days.
Why not "No expiration"? A token that never expires is a permanent key to your account. If it's ever leaked or compromised — in an old notes file, a screenshot, an email — it works forever. 90 days is a reasonable balance: long enough that you're not constantly regenerating tokens, short enough that any leaked token has a limited window of risk. When your token expires, GitHub sends you an email reminder to generate a new one. Treat that email as routine security maintenance, the same way a CA renews their digital signature certificate annually.
Select the scopes (permissions)
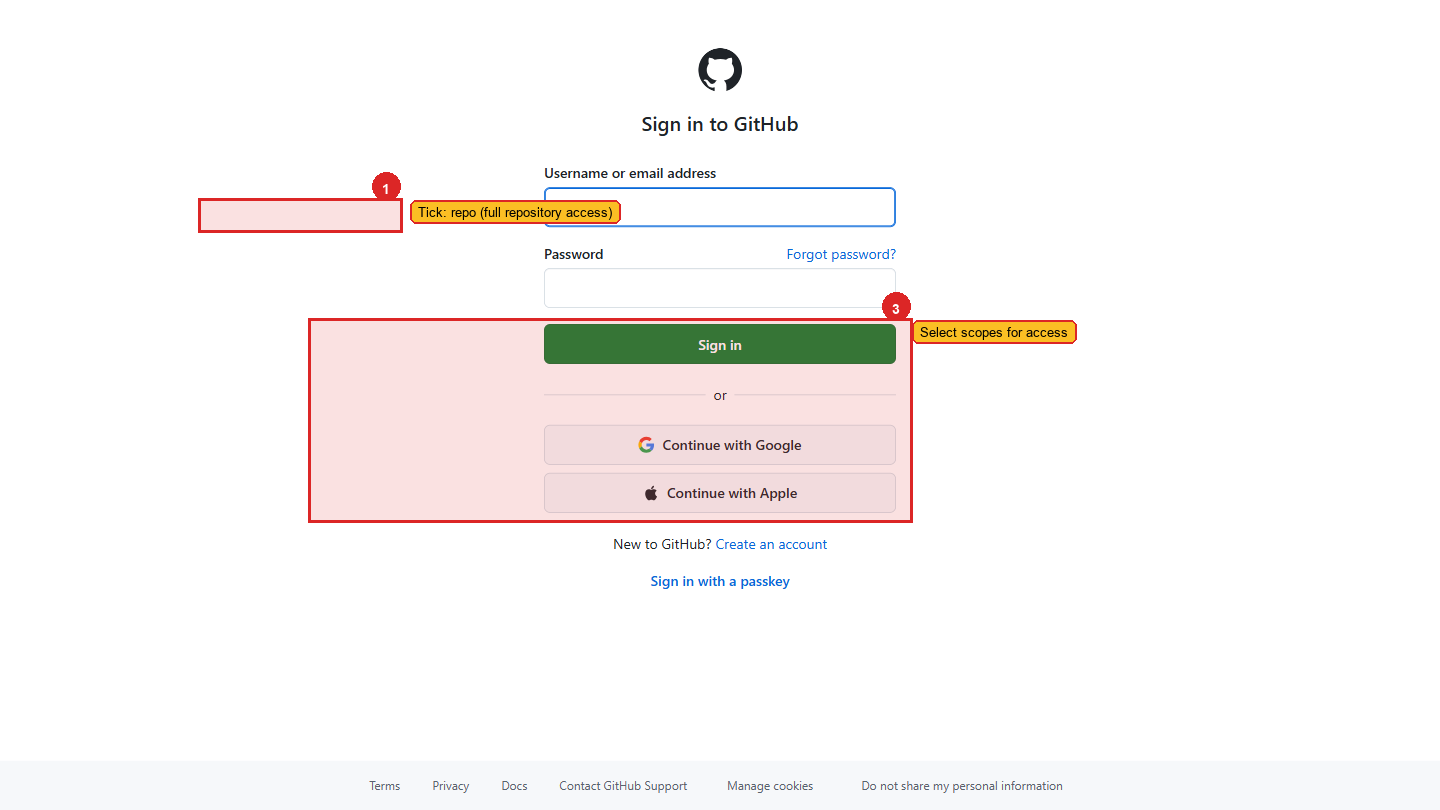
Scopes define exactly what this token is allowed to do. Only tick what you need — unnecessary permissions are unnecessary risk.
For general development work, select these scopes:
 Tick the full
 repo checkbox — this gives Git the access it needs to push and pull. Skip everything else unless you have a specific reason.
| Scope | What it allows | Why you need it |
|---|---|---|
repo (the full checkbox, not the sub-items) | Full access to your repositories — read, write, create, delete | Required for git push and pull to work |
workflow | Update GitHub Actions workflow files | Required when your project has CI/CD workflows |
read:org | Read your organization memberships | Required if you work in a team/organization on GitHub |
Do not select admin:org, delete_repo, or admin:gpg_key unless you know exactly why you need them.
Click "Generate token"
Scroll to the bottom of the page and click the green Generate token button.
Copy the token immediately
GitHub shows you your token once — only once — on the next screen. It starts with ghp_ followed by a long string of random characters.
Copy this token right now. Once you leave this page or refresh it, GitHub will never show the token again. There is no "show me my token" button. If you lose it, you must delete it and generate a new one. This is intentional — GitHub doesn't store the token itself, only a hashed version of it.
Click the copy icon to the right of the token, or select all the text and copy it manually.
Store it in VaultMate
Open VaultMate and save the token immediately. Do not paste it in Notepad. Do not send it to yourself on WhatsApp. Do not put it in a Google Doc.
In VaultMate, save it as:
- Project: Your GitHub username or "GitHub"
- Title:
GitHub PAT - VS Code Work Laptop(match the Note you gave it) - Secret: Paste the full token (the
ghp_xxxx...string) - URL:
https://github.com/settings/tokens - Category: Token
Using the token when Git asks for credentials
The next time you run git push or git clone on a private repository, Git may prompt for a username and password:
Enter your GitHub username as the username. For the password field, paste your PAT — not your GitHub password.
The password field will appear empty as you paste (terminals don't show what you type for security). Press Enter. Git will authenticate successfully.
git push. Enter your GitHub username and paste your PAT when prompted for a password. A successful push confirms the token works.If your token is compromised
If you suspect someone else has your token — you pasted it somewhere accidentally, shared it in a screenshot, or aren't sure — revoke it immediately.
Go to Settings → Developer settings → Personal access tokens → Tokens (classic)
You'll see your list of tokens. Each one has a Delete button.
Click Delete next to the compromised token
Confirm the deletion. The token is immediately invalid — any device or service using it will start getting authentication errors. It cannot be reactivated.
Generate a new token
Follow the same steps above to create a replacement. Update VaultMate with the new value.
Update anywhere the old token was used
If you configured the token in any other tools (CI/CD pipelines, other machines, deployment configs), update those too.
This token gives full access to all your repositories. Treat it like your bank PIN — something you use in private, never share, and replace immediately if you think it's been seen by someone else. A token in the wrong hands lets someone read your code, delete your repositories, or impersonate you in commits.
Checking your active tokens
You can review all your active tokens at any time:
Settings → Developer settings → Personal access tokens → Tokens (classic)
For each token, GitHub shows:
- The name you gave it
- When it was last used
- When it expires
Make it a habit to review this list every few months. Delete tokens you no longer use. A token for "Old Laptop" that was last used 6 months ago should be deleted.
An alternative — SSH keys
A Personal Access Token is the simplest way to authenticate Git from your laptop, and it's what this program uses. There's a second method, SSH keys, that some teams prefer for long-running setups — once configured, you never see a password or token prompt again.
You can find SSH keys at Settings → SSH and GPG keys.
For this program, stick with PAT. SSH keys are worth learning later when you're running deployments on servers or managing multiple machines.
Common questions
Can I use the same token on multiple machines? Technically yes, but it's better practice to generate one token per device. That way, if one device is lost or compromised, you can revoke just that token without affecting your other machines.
I forgot to copy my token. What do I do? Delete it in Settings and generate a new one. There is no recovery — this is by design.
My token expired. What happens? Git will fail with an authentication error. Log in to GitHub, generate a new token, and update VaultMate and Git Credential Manager. On Windows: Control Panel → Credential Manager → Windows Credentials → find the GitHub entry and update the password field with your new token.